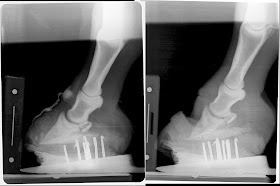
Below are radiographs from immediately post deep flexor tenotomy and 60 days post tenotomy. Noteworthy change on both are additional sole depth under tip of coffin bone. However continued remodelling of the tip of the coffin bone and a slight increase in palmar angle on the left hoof are suggestive that the dorsal portion still fails to grow at a rate similar to the palmar portion. This hoof suffered more damage as it was the "club". Deep flexor tenotomy was not performed at the recommended time. Significant pathology was identified within 5 days of onset of acute laminitis but owner refused tenotomy at that time.
A resection is required in laminitis cases that have coronary band swelling that is prolapsing over the hoof wall. The hoof will act as a tourniquet as the inner laminae experience swelling. The lack of expansion of the hoof creates massive vascular compression and starves the laminae and coffin bone of needed nutrient flow. Often times this is all secondary to inflammation arising from compromised soft tissue and bone along the toe and medial quarter as this area tends to receive the most significant load induced vascular compromise when laminae fail to suspend the coffin bone.
I like to use a cast cutter or multi-purpose oscillating saw to cut through the hoof. Usually an 1 1/2 in below the hairline is a minimum and often times I find myself removing more at a later date. The width of resection will depend on amount of coronary band involved and should extend at least 1/2 in wider than the affected coronary band.
Next I use a sharp hook on the end of hoof knife to round and smooth the proximal (upper) edge of the intact hoof wall. It is important to perform this prior to removing hoof wall because it will get somewhat bloody after removal and occlude good visualisation.
Next the hoof wall can easily be removed by grasping one end with half rounds or regular nippers. Ease of removal is directly related timing of resection. Resections based on early evidence from venograms are usually more attached versus the case that has already separated and has drainage.
One removed, a gentle massage of the coronary papillae and lamina to encourage hemorrhage and lay the papillae in a more normal position pointing downward. Note the lack of hemorrhage in the most compromised region.
Next 1/2 inch felt heavily coated in silvadene cream is cut to fit the void left behind. This is tightly wrapped with elastikon as adequate pressure is important to prevent excessive swelling and granulation. Many times with cases that are far away and I am uncomfortable with the owners ability to maintain a bandage, I will place a cast over the elastikon up to the fetlock to maintain adequate compression. Preferably, daily changing for the first three days to ensure adequate hoof wall has been removed is recommended. After that a cast can be applied and changed every 7-10 days or bandage changes every 3-4 days. Each time a new piece of felt is applied with a fresh layer of silvadene. I will also use dmso gel applied to the coronary band to aid with inflammation.
Images below are representative of what the hoof will look like at bandage or cast changes. This will depend greatly on the amount damage or compromise present. This case has significant damage with a lot of granulation already present. Ideally a resection should have been performed much earlier to prevent this level of damage to the coronary papillae. The first thing you will see is secretion of the secondary matrix horn which signifies the cornification process. Once this has covered the entire resection site, compression bandaging can be stopped and patient can go without any bandage at all. I like to see the cornification at the level of the previous hoof wall prior to stoppage of bandaging or casting.
Below are images of 5 days post resection. Notice the medial (inside) and lateral (outside) portions have already began to fill in with secondary matrix horn. The central portion suffered so much damage that the lamina are dead and unable to secrete matrix. This will fill and contract very similar to a wound anywhere else on the body via epithelialisation. A moist environment maintained with bandaging and/or cast will expedite the process.
Below are images from approximately 15 days later. A cast was placed over felt pad and elastikon for this period. Note the matrix is at the level of the hoof wall at the medial and lateral aspects and the granulation is reduced to 1/3.
These images are approximately 30 days post resection. Continued epithelialisation and secondary horn formation aka cornification.
Images below are about 6 weeks post resection and complete epithelialisation and cornification has occurred. At this point it is no longer necessary to apply cast or compressive bandages unless coronary band begins to get inflamed again.


