Welcome, About us

Hello and welcome. My name is Sammy L. Pittman, DVM and I am a veterinarian, farrier, and horsemen with a great interest in the field of equine podiatry. My wife and I own and operate Innovative Equine Podiatry and Veterinary Services in Collinsville TX. My passion lies within the health and well being of the hoof to better serve your equine companion. With so much lameness attributed to the lower limb many horses require an out of the box approach to achieve the success desired.
Give us a call and we will be glad to help you in any way we can. Thanks so much.
I will be discussing different Cases and thoughts from our world with the horse. Feel free to contact us via text or call at 903-718-0056 or send an email to iepvs11@gmail.com. Thank you for reading and enjoy
Showing posts with label hoof specialist. Show all posts

Monday, December 22, 2014

How to Take Farrier Friendly Radiographs. Presented at OSU CVM fall conference 2014

How to Take Farrier Friendly Radiographs
Sammy L. Pittman, DVM
Innovative Equine Podiatry and Veterinary Services, Pllc

            Gaining relative information within the hoof capsule, that helps the vet/farrier team make decisions, requires a consistent and detailed approach.  Most of us learn radiographic technique that concentrates a study on bony structures.  The same radiographic views that detail the coffin joint or navicular bone are essentially useless to designing a therapeutic shoeing program.  It gives us no reliable information with regards to the mechanical properties that are in play. 
            Informative radiographs are relative to the answers we seek.  Being attentive to the many details will allow consistent repeatable and comparative images.  Following the guidelines below will give you the ability to produce consistent and reliable radiographic exams helpful in evaluating the mechanical properties affected by trimming and shoeing. 
1)  Place both hooves on blocks that are designed to allow the primary beam to penetrate the hoof between the palmar rim of the coffin bone and ground surface.  Wire embedded into the surface of the blocks is helpful when measuring relevant angles.  To determine height of blocks set your xray generator on the ground and measure to the center of the crosshairs on the collimator then subtract 1/2 to 3/4 of an inch.  This will consistently place your beam just below the coffin bone in most barefoot and shod horses with the exception of large padded packages.  If the horse toes out then the blocks toe out as well and the same for  a toed in conformation.  Blocks should be about the same width apart as the gap in between the upper forearm at the level of the sternum.  This will be about one hands width in most light breed horses.  The hoof should be set to the medial and palmar/plantar edge of the block to allow the radiograph cassette/plate to be touching the hoaof in the lateral view and as close as possible in the dorsopalmar views.  Aligning the frog stay or central sulcus with the sagittal wire marker embedded into the block will aid in appropriate beam alignment for the Dp and lateral view. 

2)   Beam orientation must be centered on the area of interest.  Trying to identify important measurements relative to therapeutic shoeing and trimming requires a low beam orientation.  This is consistently obtained by setting up your blocks as previously described.  A perpendicular beam to cassette/plate orientation should always be obtained to prevent distortion of your image. 

High beam


High Beam


Low beam


Low Beam


3)  The cassette/plate should be touching the hoof on the medial side in the lateral view to prevent as much magnification as possible. 
4) Use radiographic paste to mark the dorsal hoof wall in the sagital plane in all lateral views.  The paste should start where the last hair exits and extend to entire length of the hoof capsule.  This allows accurate measurement of coronary band to extensor process distance, horn-lamellar zones, and allows definition of every ripple, defect or growth ring. 
5)  Focal film distance should be always consistent and can range from 24" to 28".  Typically with today's smaller units closer to 28" allows visualization of just below fetlock.  Just keep it consistent. 
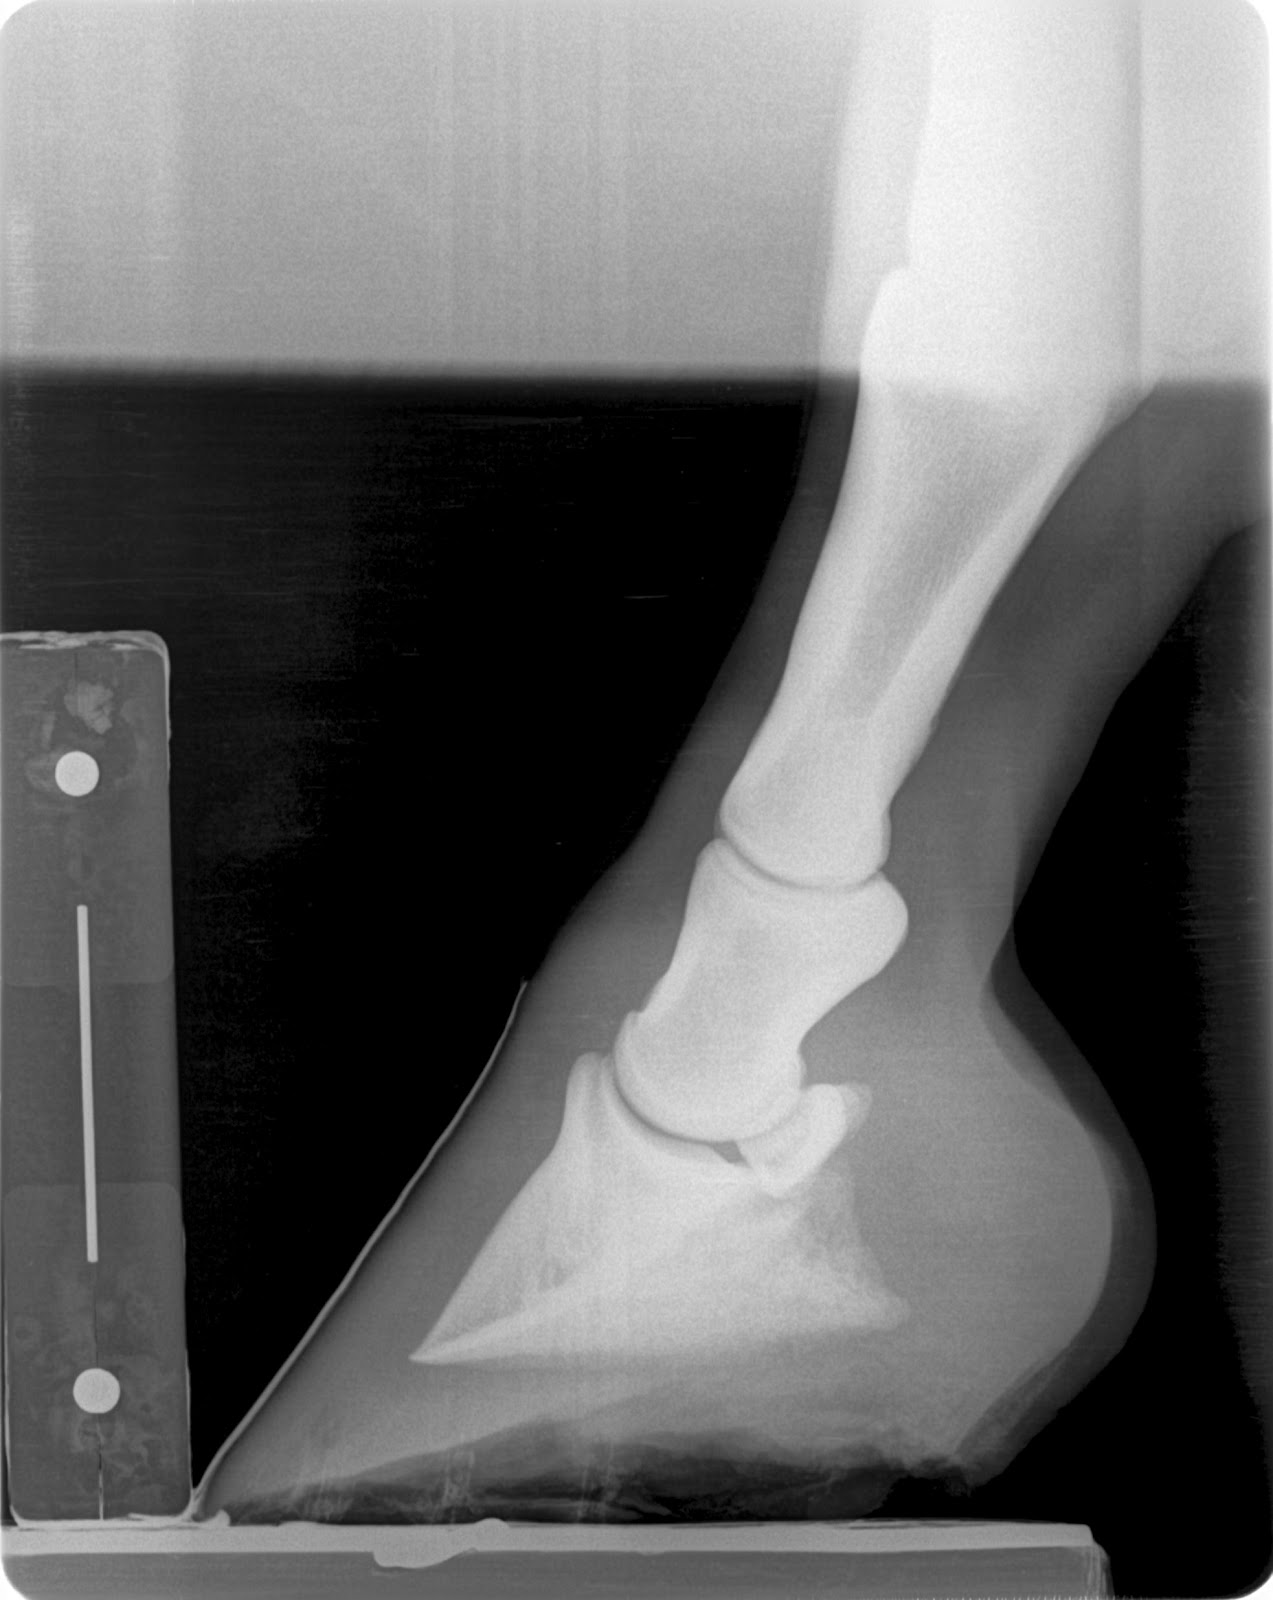
6)  A calibration instrument should be placed in the sagittal plane for the lateral and the transverse plane for the dorsopalmar view.  Most digital radiographic software allows for calibration based on a known measurement in the radiograph.  Metron software has a built in calibration component and a specific calibration instrument embedded into their blocks or an autoscaler.  However, simply placing a known length of wire or metal bar stock in the plane of interest will allow you to calibrate your radiograph regardless of software.  Calibration is important to correct for magnification that occurs. This magnification will be consistent if you your radiographic technique is consistent but it is important to document this detail.  Typical magnification is around 10 percent.  This factor is important if you are taking measurements on the radiograph and transferring them to the hoof.   Correction of magnification without software can be accomplished by a simple math equation. Where (actual foot measurement)={ (Length of Calibration tool) x (radiographic measurement of concern)} / ( radiographic measurement of the calibration tool).


Good Bone Detail but not good for soft tissue
7)  Radiograph technique can vary widely but typically  low Kvp  and higher Ma produces better soft tissue detail.  Today's digital units often give us a good representation of bone and soft tissue detail but it is still worth playing with your settings to find greater grey scale within the hoof capsule.  Seeing the dermo-epidermal junction is a good guideline to know if you are seeing enough soft tissue detail.  I also like to see the deep flexor tendon in my foot films.       
            Currently I measure and monitor several distances and angles to follow the health of the foot, design therapeutic shoeing plans and monitor disease processes.  Below is a description and diagram of each measurement, how to measure and a short discussion about each measurement.


            Coronary band to extensor process (CE) is measured from top of paste which is applied at most proximal aspect hoof wall at the point of the last hair follicle down to the extensor process of the coffin bone.  This will range from 8 to 30 mm in most healthy hooves.  This number does not give you much information as a single measured parameter.  However, when monitored and compared in serial radiographs, especially when monitoring an acute laminitis case, it is extremely valuable. For example, an acutely laminitic patient that measures 8mm on day 1 of clinical signs and then measures 18mm on day 4.  This is a 10mm  distal displacement which is usually accompanied by a 10mm decrease in sole depth as well and varying degrees of rotational displacement.  

            Horn-Lamellar zone (HL) is measured in two areas, one proximal just below extensor process and one distal just above apex of coffin bone.  This will most commonly measure 15 mm in most light breed horses but can be as high as 20mm in larger breeds, mules and donkeys.  This measure is expressed as proximal HL/Distal HL (15/15).  Instead of measuring only rotation this will give you a measurable displacement that is more definitive than a generic rotation.  Evaluating the dermal-epidermal junction is also of great importance as it should split the horn lamellar zone further defining each.  This allows more specific interpretation of changes in the HL zone.  For example with laminitis the L component of the HL zone will change not the H component.  Early in laminitis this may be the only notable change and an increase of 3-4 mm is a significant finding and may have no measurable rotation.  Several important disease processes can be discovered in this zone and many foot diseases such as clubs, chronic/acute laminitis, white line disease, keratomas and abscesses have very unique qualities that can be shown here.

            Sole Depth (SD) is measured from the tip of the coffin bone down to most distal aspect of the sole.  The cup is also of importance as it is present to different degrees depending on health or pathology and can also be falsely created.  This measurement is expressed as SD/Cup.  Healthy feet with no pathology will most commonly carry 12-15mm of sole and a 2-3mm cup (15/3). This should be of upmost concern of the vet/farrier team when striving to obtain soundness and health of the foot.  This should be the measurement at the day of the farrier visit.  Often thin soled horses are at 6-7mm of sole 8 weeks into the cycle and this is a sign of a compromised foot that requires a different approach to increase foot mass and health. Two measurements can be made to give you more information, one at tip of coffin bone and one under wing of coffin bone.  Venogram findings suggest that a depth of 15mm is required to maintain a healthy appearance to the solar vascular bed with robust and correctly aligned terminal papillae

            Digital Breakover (DB) is measured from the tip of the coffin bone to where the foot or shoe if shod would leave the ground.  Healthy hooves that maintain adequate SD and good digital alignment will commonly maintain a DB of 20-25mm.  Many times in perimeter fit shoes, depending on type of foot, bone angle, and toe lever this number is considerably higher than ideal at the day of the farrier visit and continues to lengthen throughout the cycle due to hoof growth. This gives us a measurable lever arm that applies its force to the deep digital flexor tendon and its subsequent force impacts on apex of the coffin bone, dorsal hoof wall and navicular apparatus.  Below I discuss toe lever (TL) that in my opinion gives a more accurate understanding of the lever arm involved. 

            Bone Angle (BA)  is the angle of the coffin bone when viewed in a lateral radiograph.  Average BA will be 50 degrees.  In my practice I have measured BA's as low as 36 degrees in very low heeled and long toed horses to 70 degrees in club feet.  The shape of the coffin bone determines the shape of the hoof.  Most of the time the horses that have low heel long toe conformation will have a less than 50 degree bone angle with a long measurable toe lever (see below) and the opposite is true for upright club feet. Granted, horses that have overgrown unkempt feet may have crushed heels and a long toe but may have a good BA.  I feel that monitoring this parameter early in life could potentially identify feet that may have a common sequalae with regards to lameness later in life.  For example, a horse with a 42 degree BA and a 70mm Toe lever may be at higher risk of hyperextension injuries of the pastern, coffin and fetlock joint and increased tension strain on deep digital flexor tendon, and navicular apparatus when compared to a coffin bone with a lower bone angle and shorter toe lever. If we could identify this early in a horse's career and change the shoeing protocol to better manage this handicap maybe we could reduce the  amount of wear and tear to some degree.  

            Palmar angle (PA) also known as solar angle of the distal phalanx or ventral angle is measured from the wings of the coffin bone in comparison to a level ground surface or embedded wire in block.  It can be tricky to measure in some feet with considerable bone remodeling.  Using the wings will offer the  most consistent measurement. This gives us a manner in which to evaluate flexor tendon engagement. In general lowering the PA increases tendon tension and raising should decrease the tension. This angle will average 3-5 degrees in the horse that maintains adequate sole depth and is free of lameness but can vary greatly.  PA should be evaluated in this manner:  Is this PA healthy for this foot?  The answer comes from evaluation of sole depth, clinical exam and digital alignment.  For example, PA measures 8 degrees and maintains a SD of 15/3 and good digital alignment.  This case is higher than what is ideal but currently considered healthy for this case.  On the other hand PA measures 3 degrees and sole depth is 7mm.  This is not likely a healthy PA as a higher PA with less deep digital flexor tendon tension will unload the solar corium and vital growth center of the sole.  This angle is also of great value to monitor in a preventive podiatry program.
Toe Lever (TL) can be expressed as static toe lever or shod toe lever.  Shod TL is  measured from center of center of rotation of the coffin joint to where the hoof/shoe would leave the ground and static TL is measured from the center of rotation to the tip of the coffin bone.  Shod TL we can effect and static we cannot.    Lower BA coffin bones typically  have a longer TL than higher degree.  In my practice I see static TL as short as 45mm to as long as 75mm in adult horses.  Monitoring this at a young age may allow us to apply orthotics that will decrease the effective lever arm that antagonizes the lower limb.  Therapeutic shoe packages can be evaluated with regard to amount of lever arm relief.  Simply setting the shoe back only effects this measurement a few millimeters and sometimes many lameness issues respond to a TL that is 3-4 times less than what is measured on their bare foot. 

Tendon Surface Angle (TSA) is measured on this distal part of the navicular bone compared to a level ground marker. This is relative to the course of the deep digital flexor tendon takes at turns to attach to the coffin bone.  Monitoring the change of TSA with your applied orthotic is of value especially cases that show navicular bone lesions in this region.   Simply changing DB  may be beneficial in many cases however raising PA and TSA is often required to be therapeutic.

References:
            1.  Redden, R.F. Clinical and Radiographic Examination of the Equine Foot. In Proceedings  Am. Assoc. Equine Pract. 2003;49:174.
            2.  Merit, K.  How to take foot radiographs. In proceedings Am. Assoc. Equine Pract. 2008.

            3.  Floyd, A. Mansman, R.  2007  Equine podiatry, Radiology and Radiography of the Foot.  pg 141

Sunday, January 13, 2013

The grey are aka "the hoof" article


The Grey area aka the hoof


            As horse owners, farriers, trainers and vets we all know about the ever increasing foot ailments that horse's endure.  We have all heard the saying, “No foot, No horse”.  Do we really live that approach in our day to day lives with our equine companions?  Have we really obtained all the information possible about our horse's hoof dynamics?  The majority of hoof lameness' and even upper limb lameness' are a mechanical diseases that can benefit from a well developed mechanical solution based on evaluation of the forces at play within the hoof combined with accurate diagnosis and medical therapy. The hoof is often times overlooked as many of the people involved in the care of horses do not have all the information necessary to help maintain a healthy foot.  Farriers have good working knowledge of trimming, nailing, using various tools in there day to day job but many lack knowledge of internal anatomy, radiographic anatomy and physiology.  Veterinarians have a good understanding of anatomy, physiology and diseases but lack many of the hands on skills,  knowledge of external hoof characteristics and techniques that a farrier takes for granted.    The grey area is birthed from neither profession has enough information to communicate on the same level.  As a veterinarian I was not educated on bio-mechanics, how to take farrier friendly radiographs, or how to evaluate lower limb mechanical forces.  There just isn't enough time to completely cover all aspects of the horse while in veterinary school. Most veterinarians base their therapeutic recommendations on findings in veterinary lameness text or based on empirical personal experience and not a well designed mechanical plan based on radiographic findings.  I know this because that was my approach upon graduating veterinary school.  I find in my everyday practice that many hoof care professionals are unaware of a more in depth approach to evaluating and treating hoof disease and lameness.  When we combine the knowledge of both professions with egos aside and develop a plan from that combination more success will arise.  Many foot ailments can be a financial and emotional drain and require aggressive, quick and precise mechanical and medical treatments to be successful.  I have been fortunate to learn from a pioneer in the podiatry world, Dr. Ric Redden of Versailles, Ky.  Through his practical and innovative use of venograms, serial podiatry style radiographs and new mechanical devices, many horses are relieved of unnecessary pain and suffering. 

            Below are four basic guidelines for successfully maintaining healthy hooves and approaching hoof lameness issues. 
1.     

Nutrition- We are all aware that skinny horses do not typically grow good hooves, but did you know that research has shown that added biotin at a rate of 100mg per day will increase hoof quality.  Common hoof supplements that are commercially available only supply 10-20 mg daily. Biotin is long been noted to aid in hair and hoof growth.  All of my hoof cases that have poor quality hoof,  thin soles, slow growth or laminitis (founder) are started on 100 mg of Biotin daily.
2.      Balanced mechanical forces-  This information is obtained from careful and in depth examination of external hoof characteristics combined with information based on measured soft tissue parameters from a farrier friendly radiograph.  Radiographs must be taken in a consistent manner to obtain results that can be compared between radiographs. Radiographic measurements that are important to evaluate are:  Coronary band/Extensor process distance (CE), proximal (top) and distal (bottom) horn lamellar zone (H/L), digital breakover (DB), sole depth (SD), and palmar angle (PA).  Accurate assessment of these parameters will give you an idea if the horse's hoof is within a healthy range  or not.  To be successful in many common foot ailments, such as laminitis, navicular syndrome, caudal heel pain, long toe/low heel and club feet, it is paramount that precise radiographic evaluation of the forces at play is accomplished.  The basis for all my therapeutic recommendations comes from these measurements.  Below is a diagram of soft tissue parameters commonly utilized.      
                                                                                                                                                                                                                                                                                                                                                                                                                                                                                                                                            Farriers are often given a very vague prescription such as wedge the heels and back the toe up, but how much wedge and where should the toe be backed up to.  A more precise prescription might include:  DB at 0 mm, PA increased from 0 degrees to 10 degrees and use of aluminum rail shoe rockered mid shoe attached with glue and fit with a positive pressure frog plate.  In order for a prescription like this to be given and received both farrier and veterinarian must speak and understand the same language, which also means that both individuals have pursued a higher level of understanding of the equine hoof. 
3.      Preventive hoof care programs-  Many equine hoof ailments are results of long standing minor mechanical imbalances and predisposing genetic traits. Many of these can be identified early in life and monitored on annual basis via farrier friendly radiographs.  For example, if your horse as a yearling has long pasterns, zero degree pa and a 30 mm breakover then you can assume that as an adult he will be predisposed to crushing his heels, maybe have thin walls and sole.  However since it has been identified at an early age a maintenance program for the farrier can be developed that may differ from a basic perimeter fit steel shoe or traditional trimming. Many horses these days are not blessed with perfect feet and many would benefit from minor modifications in shoeing approach early in life to help delay or prevent the onset of hoof disease.  A preventive hoof care program should involve a yearly podiatry style exam with radiographs that could be easily included into your yearly vaccination and wellness exam.   Foals should be evaluated within the first week of life and every month for the first year of life.  Radiographs can be taken any time along the way but definitely prior to entering training as to develop a hoof care plan.  We as hoof care professionals need to be focused on maintaining hoof mass and quality instead of pretty and appealing to the eye.   We can find minor changes in the measured soft tissue  parameters long before bone changes occur and before the horse will exhibit pain or discomfort. 
4.      Regular and consistent farrier visits-  It is very important to have shoeing/trimming intervals that are appropriate for the  individual horse as mechanical properties and soft tissue parameters change early in the shoeing interval.  Often times by the end of the shoeing period, especially if overdue, the soft tissue measurements such as palmar angle and digital breakover have entered into an unhealthy zone.  Using the podiatry style radiograph to design a healthy protocol that may maintain a healthier palmar angle and digital breakover longer in the shoeing cycle is another added benefit for preventive hoof care programs.
           
            In conclusion, I would like to see veterinarians and farriers alike adopt this similar language and radiographic techniques to evaluate the equine hoof. Without regard to consistent technique and  a detailed evaluation of the mechanical formula there is an inherent risk of not obtaining the level of success that one may desire.   What we do, and more importantly what we do not do to the hoof, not only has an affect today but in the future as well.  We all need to recognize that a perimeter fit flat steel shoe may not be the best option for every horse, as simple modifications may prolong the health of the foot and prevent problems down the road. 

Further reading and resources: 
1.      Dr. Redden's website, www.nanric.com, numerous articles regarding evaluation and treatment of many common foot ailments and soft tissue parameter measurement illustrations and articles.

Monday, September 3, 2012

Cyril's Hoof Spring

This is a technique I learned from a farrier from Switzerland (Cyril Zuber) while at Dr. Redden's advanced equine podiatry class last month.  This case experienced a severe heel bulb laceration about a year ago.  All has healed up but a severe contraction secondary to loss of heel mass from injury and lack of full load bearing has occured.  I can't say if the contraction component is related to any lameness but a more cosmetic hoof could be obtained.

Below is radiographs and photos of the hoof and spring application process.  At the very end is a video of the spring being released showing the action that it is applying to the hoof capsule.

I placed in a custom steel rocker rail to fully load heels and maintain a self adjusting palmar angle with greatly reduced toe lever.


Friday, August 31, 2012

New navicular case

I have been too busy to post many cases in the last few months.  Thanks to Isaac we are getting some rain which allowed me a few hours on the computer

 The following is a case from this week.  This is a 7 year old  pleasure horse with a long term history of choppy gait and off and on head bob responsive to bute.

1/5 lame bilateral but 2/5 on left turn in a tight circle.  Left front is a grade 1+ club and podiatry style films confirm healthy soft tissue parameters.  My thought process is:  With healthy sole depth and minimal remodelling of the apex of coffin bone on a club foot I want to next look at the navicular bone to evaluate for lesions.  This case shows significant lesions in several views.  This are most likely in the distal half of the flexor cortex of the navicular bone.  I find these similar lesions in younger non lame patients but I do feel as they reach middle age they begin to create lameness.  Dr. Redden feels that the navicular bone of the club foot does not recieve as much load from the tendon versus the lower profile foot and does not develop as strongly as the low foot.  I am beginning to feel that these lesions are developmental and become more degenerative with age and use.  If dissected out these lesions will be a slight depression in the flexor cortex with a roughened edge that likely causes some abrasiveness to the deep digital flexor tendon.

My treatment plan is to drastically increase palmar angel to reduce load on the painful area.  This will allow some decrease in inflammation and likely a lower mechanical shoe in the future.  I have also prescribed a 5 day course of bute to decrease pain and inflammation.  I choose mechanical options first as it is a very low risk treatment and we can always resort to injections of the coffin joint and/or navicular bursa.  However I find that most of my cases respond very well to mechanical enhancement alone.  I will let you know about the response we obtain in this case.

Below are images of the navicular bone, pre and post shoe podiatry radiographs and digital photos of the patient.

Click here to shop Dr. Reddens products (shoes, ultimates and much much more) SHOP NANRIC


 Note the better digital alignment the drastic change in palmar angle, tendon surface angle and reduced toe lever.  This shoe changed PA by 12-14 degrees which will unload the tendons load on the navicular bone by 50 to 60 percent.


Thanks for looking.

Thursday, November 24, 2011

Update on Severe White line disease case

It has been a while since my last post.  I am writing this as we are driving down the road headed to visit family on Thanksgiving Day.  We had a great clinic in October with Dr. Ric Redden.  I plan to post images from the clinic. We had an interesting mild laminitis case in which we performed venograms the day of the clinic and we did follow up venograms about 2 weeks later.

The case below is one we have been working with for several months and it is coming along very well.  We had our most dramatic increase in sole depth this last cycle and we now are very close to what I would consider a normal sole depth for this size of horse.  The fungal invasion noted by defects in the hoof wall on radiographs and visual inspection is no longer present.  We reset the rocker rails with positive pressure frog bar and plan to have the next visit in conjunction with regular farrier and turn it back over for 2-3 cycles.

Please look back at previous post for comparative photos and radiographs.


We reset the rockers using nails against the hoof wall and superfast adhesive to attach nails to hoof wall.  One roll of 2 inch casting tape was then applied over that.

HAPPY THANKSGIVING!!!!!!!!!!!!!!!!!!!!!!!!!!!!!!!!!!!!!!!