Welcome, About us

Hello and welcome. My name is Sammy L. Pittman, DVM and I am a veterinarian, farrier, and horsemen with a great interest in the field of equine podiatry. My wife and I own and operate Innovative Equine Podiatry and Veterinary Services in Collinsville TX. My passion lies within the health and well being of the hoof to better serve your equine companion. With so much lameness attributed to the lower limb many horses require an out of the box approach to achieve the success desired.
Give us a call and we will be glad to help you in any way we can. Thanks so much.
I will be discussing different Cases and thoughts from our world with the horse. Feel free to contact us via text or call at 918.235.1529 or send an email to iepvs11@gmail.com. Thank you for reading and enjoy

Monday, April 10, 2017

Hoof mapping

Need to freshen up the blog as it has been a while since adding information here.  I have been playing with different mapping protocols to help find the center of rotation of the coffin  joint.  I first heard of the golden means ration from Craig Trnka and Scott lampert.  I will admit it sounded a little fishy at first but after playing with it for a few years it is amazing how many things in life follow this proportional developent.  Follow the link below to learn more.

GOLDEN RATIO

Basically the coffin bone follows closely a proportional development.  Once you can identify the tip of p3 and the wings you can then use a golden ratio caliper to find a point that is very close to the mechanical center of rotation of the coffin joint.  It has long since been known that managing the forces around the coffin joint are very important and identifying this point on the foot surface can be very consistent.  It correlates well with other reported mapping protocols.  It commonly lines up with the trimmed bars and widest part of the white line.

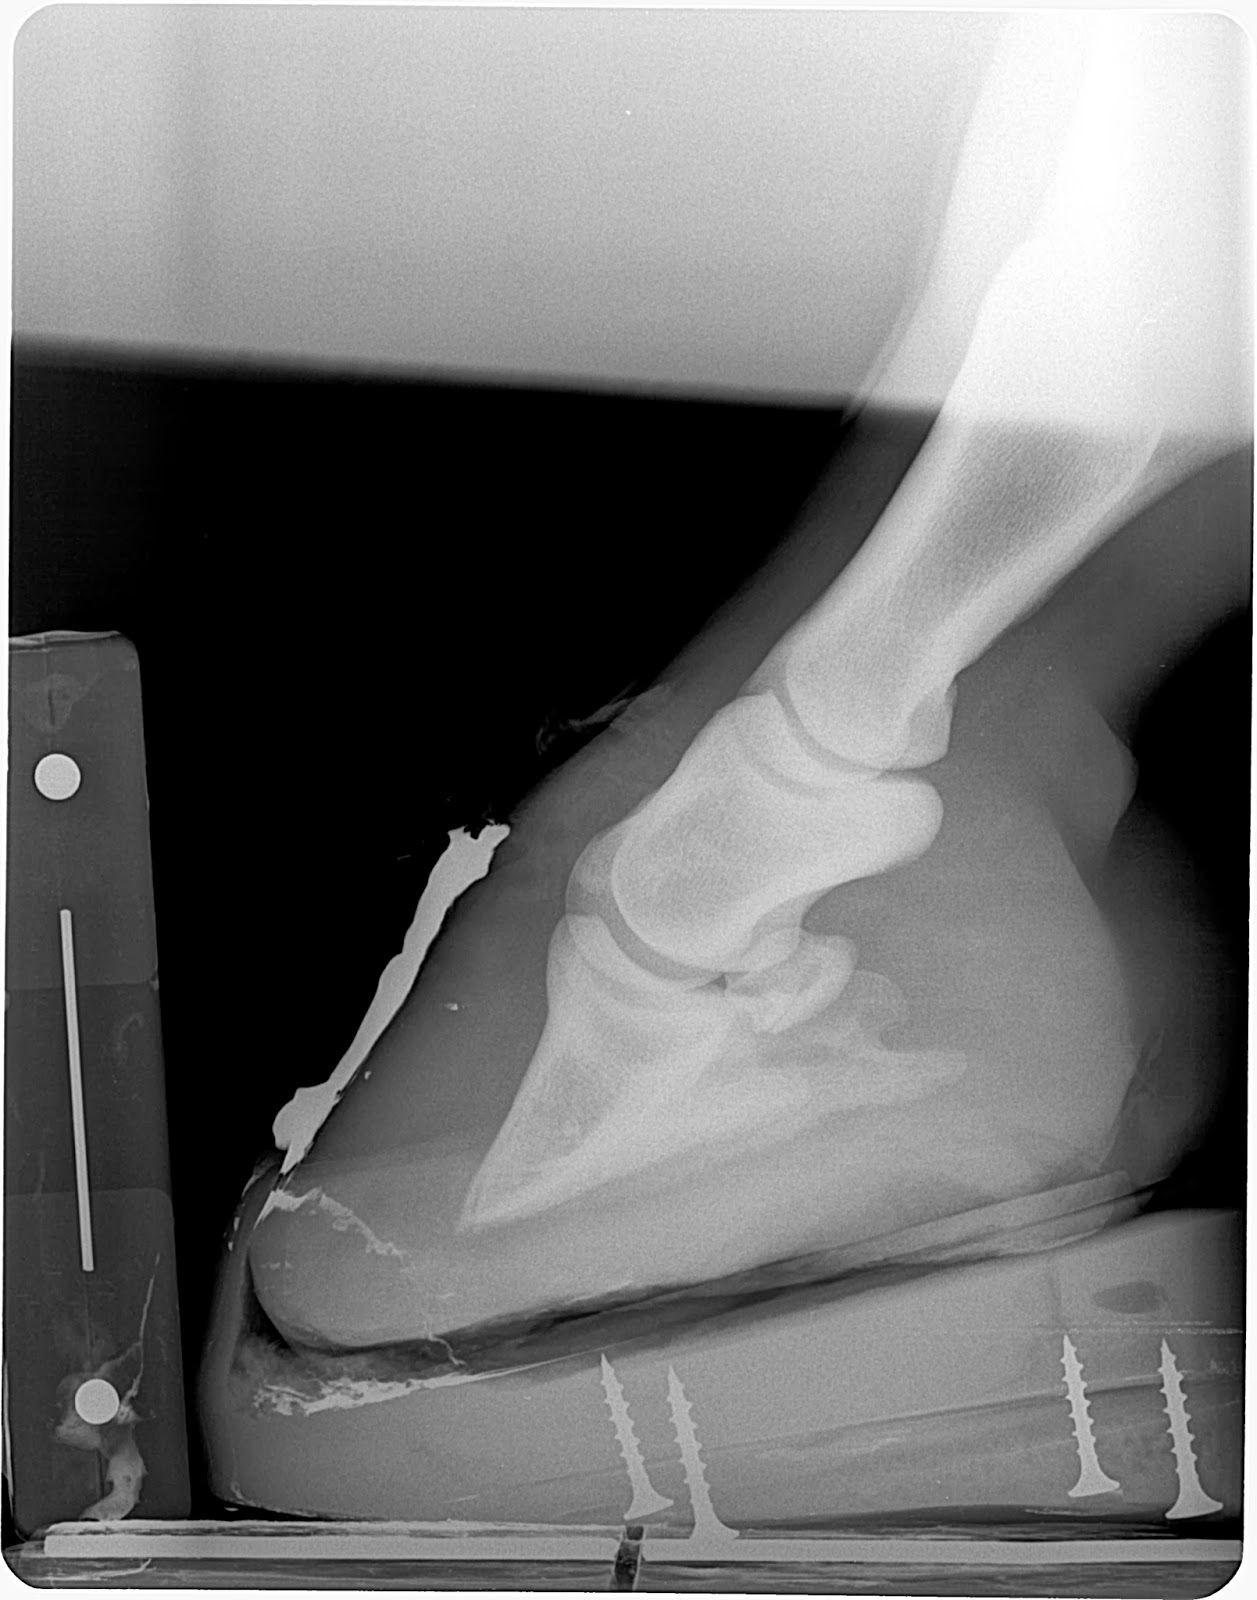
Wings can be located very close to the angle of the sole.   It is more accurately place at the stratum internum where the bar turns in at the heel.  Then carry a line towards the toe very close to parallel to the central sulcus.  Where this point crosses the white line will also be very close to the tip of the coffin bone.  I confirm this with measuring a thumbs width in front of the apex of the frog.   Using the golden means caliper place the short side at the heels and long side at tip of coffin bone.  The center point of the caliper will be very close to the center of rotation of the coffin joint.  This point will often line up very close to the insertion of the deep flexor tendon as well.  A line dropped perpendicular to the wings of the coffin bone and centered on the center of rotation will cross this point on the ground surface of the hoof.

Note the thumb tack and its alignment to the center of rotation of the coffin joint.  Also note the barium marking the point located on the heels that corresponds to the wings.  In sound young horses with no lameness or pathology I would strive to balance the leverages around this point.  Often times a rockered rolled toe is all that is needed.  Many coffin bones and hooves have such long toe levers it is impossible to provide even toe and heel levers.  One cannot leave excessive heel length as it is a hazard and can act a lever that could lead to a crushing of the horn in the heel.  In these case I recommend placing the toe lever as far back as the tip of the coffin bone and adding modifications to the ground surface that improve ground interaction.  A combined rolled toe with concaved inner rim and a fullered heel branch will encourage the toe to sink and the heel to float.  This will aid in prevention of heavy tendon load and hyperextension of the coffin joint.
Fullering the branches behind the COR and concaving in front helps with the interaction of the hoof in soft footing.   This could very easily be a maintenance shoe for a young horse in training.  This may help delay lameness that often occurs with performance from chronic low grade overload of the deep flexor tendon, navicular apparatus and coffin joint.  If lameness exist a much greater mechanical advantage will likely be needed to unload and manage an already painful system.  Bar shoes are one very effective way to balance out the sink/flotation aspect of hooves with excessive toe levers.  Commonly I use these ground surface modifications combined with wedges that are fully rockered from toe to heel.  


Wishing you the best of the best!

Thanks for reading.  

Sammy


Sunday, August 2, 2015

Moved To Texas!

We have moved our practice headquarters to Collinsville, Tx.  500 Rice Rd Collinsville, Tx  76233 to be exact.  We are in the process of remodeling and building a clinic that will be focused on treating and managing all foot problems.  In house rehabilitation for tougher cases, such as laminitis, foot puncture wounds and lacerations, that respond better with daily intense care and monitoring.

 We still continue to offer most equine veterinary services but focus on therapeutic farriery,  Lameness exams and consulations, Pre-purchase examinations, managing foal limb development, and designing a hoof management program for all stages of life and careers.

Thank you for your continued patronage.

Sammy L. Pittman DVM

Monday, January 12, 2015

Upcoming clinic reviewing venogram procedure and interpretation


Introduction to the mechanics of the lower limb and evaluation radiographically and clinically

Introduction to the mechanics of the lower limb and evaluation radiographically and clinically
Sammy L. Pittman,DVM
Innovative Equine Podiatry and Veterinary Services, Pllc
            Considering a large component of lameness occurs in the lower limb and the equine hoof a thorough understanding of the forces at play are very helpful.  We often examine and treat lameness from a medical standpoint but are not fully recognizing and changing the biomechanical properties that are very likely involved in creating the lameness. 
            The detailed anatomy is covered at length in many text, conversely, I want to focus on the functional anatomy as it relates to the mechanical properties of the equine digit.  Consider the deep digital flexor tendon arising from the combined flexor muscle bellies coursing distally over the palmar/plantar aspect of the fetlock and pastern then over the navicular bone to attach to the semi-lunar crest  on the solar aspect of the coffin bone.   The tendon attaches firmly to the bone and the bone is attached to the hoof wall via the lamellar network.  Think of these combined anatomical structures as creating a sling or hammock for the boney column.  See figure 1 for a drawing emphasizing the suspension and support components.  Also consider the frog, ungual cartilages and digital cushion as support structures accepting load  that is determined by the balance of load from the suspension system. 
            To further define the deep digital flexor tendon suspension theory, consider a deep flexor contracture case versus a tendon laxity case in young foals.  The contracture case has no load on the heels as they are suspended in the air via the shortened tendon unit.  Compare to the tendon laxity case in which the toe is popping up and the heels and bulbs are the weight bearing component.   This is a high suspension versus low suspension comparison and further describes how the deep flexor tendon has a great influence on what structures are loaded within the hoof capsule. 


 Figure 1 Suspension components and support  components


            Now let's think about what load does to the hoof.  For example compress one side of your fingernail and watch it turn pale in color.  This is a load induced vascular compression that prevents the vascular network from filling.  The same goes for the equine digit.  When weight is placed on the limb the vascular network is loaded and blood moves out of the loaded areas to unloaded areas.  This is easily confirmed by performing venograms.  As long as the compression is temporary and balanced throughout the hoof it is of no consequence.  However when long term compression occurs, bone and soft tissue suffer the effects of decreased nutrient flow.  This is evidenced by lack of growth of sole and/or hoof wall and boney remodeling of the coffin bone.  Consider a high grade club foot versus a crushed heel foot.  Club feet have trouble growing sole directly under the apex of the coffin bone and dorsal hoof wall.  Hooves with tendencies to have long toes and low heels with difficulty growing heel.  These are both load induced vascular compressions secondary the loads determined by the deep flexor tendon suspension. Figure 2 compares a foot with a severe negative palmar angle on the left to a grade 3 club on the right.  The foot on the left has vascular compression under the wings of the coffin bone and the foot on the right has compression under the apex of the coffin bone.  The tighter suspension unit of the club syndrome transmits a greater proportion of the load to the toe. The crushed heel with less deep flexor suspension allowing more load at the heels. 


Figure 2 Negative palmar angle venogram on the left compared to a grade 3 club foot venogram on right.

            Radiographic investigation with properly taken podiatry style radiographs will allow definition of the areas that are chronically loaded. Coffin bone shapes tell us the history of the loads that have been applied to it.  Wolfe's law describes that bone remodels along lines of tension and compression   Coffin bones shapes of club feet have a characteristic bump about halfway down the face of the coffin bone, lipping at the apex and resorption directly under the apex, secondary to forces acting upon these regions from shortened musclotendinous unit.  The articulation will also develop with more dorsal orientation.  Compare to the low heel foot which will have a straight face and tip of the coffin bone with  a scallop resorbed in the wings from the load placed in this region.  The articulation develops further palmarly closer to the wings.  Evaluation of the center of rotation of the coffin joint will show that the more upright clubby type foot has much less coffin bone dorsally when compared to a lower heeled, long toe foot.  This effects the lever arm working against the deep flexor tendon that is necessary to consider when treating the long toe low heel horse. 
Taking consistent radiographs before and after shoeing on all my foot lameness cases allows a greater understanding of the mechanical properties that matter to the horse.  Below is a review of the soft tissue parameters that  I routinely monitor.   


Figure 3 Soft tissue parameters


            Coronary band to extensor process (CE) is measured from top of paste which is applied at most proximal aspect hoof wall at the point of the last hair follicle down to the extensor process of the coffin bone.  This will range from 8 to 30 mm in most healthy hooves.  This number does not give you much information as a single measured parameter.  However, when monitored and compared in serial radiographs, especially when monitoring an acute laminitis case, it is extremely valuable. For example, an acutely laminitic patient that measures 8mm on day 1 of clinical signs and then measures 18mm on day 4.  This is a 10mm  distal displacement which is usually accompanied by a 10mm decrease in sole depth as well and varying degrees of rotational displacement.  

            Horn-Lamellar zone (HL) is measured in two areas, one proximal just below extensor process and one distal just above apex of coffin bone.  This will most commonly measure 15 mm in most light breed horses but can be as high as 20mm in larger breeds, mules and donkeys.  This measure is expressed as proximal HL/Distal HL (15/15).  Instead of measuring only rotation this will give you a measurable displacement that is more definitive than a generic rotation.  Evaluating the dermal-epidermal junction is also of great importance as it should split the horn lamellar zone further defining each.  This allows more specific interpretation of changes in the HL zone.  For example with laminitis the L component of the HL zone will change not the H component.  Early in laminitis this may be the only notable change and an increase of 3-4 mm is a significant finding and may have no measurable rotation.  Several important disease processes can be discovered in this zone and many foot diseases such as clubs, chronic/acute laminitis, white line disease, keratomas and abscesses have very unique qualities that can be shown here.
            Sole Depth (SD) is measured from the tip of the coffin bone down to most distal aspect of the sole.  The cup is also of importance as it is present to different degrees depending on health or pathology and can also be falsely created with a hoof knife.  This measurement is expressed as SD/Cup.  Healthy feet with no pathology will most commonly carry 15mm of sole and a 2-3mm cup (15/3). This should be of upmost concern of the vet/farrier team when striving to obtain soundness and health of the foot.  This should be the measurement at the day of the farrier visit.  Often thin soled horses are at 6-7mm of sole 8 weeks into the cycle and this is a sign of a compromised foot that requires a different approach to increase foot mass and health. Two measurements can be made to give you more information, one at tip of coffin bone and one under wing of coffin bone.  Venogram findings suggest that a depth of 15mm is required to maintain a healthy appearance to the solar vascular bed with robust and correctly aligned terminal papillae
            Digital Breakover (DB) is measured from the tip of the coffin bone to where the foot or shoe if shod would leave the ground.  Healthy hooves that maintain adequate SD and good digital alignment will commonly maintain a DB of 20-25mm.  Many times in perimeter fit shoes, depending on type of foot, bone angle, and toe lever this number is considerably higher than ideal at the day of the farrier visit and continues to lengthen throughout the cycle due to hoof growth. This gives us a measurable lever arm that applies its force to the deep digital flexor tendon and its subsequent force impacts on apex of the coffin bone, dorsal hoof wall and navicular apparatus.  Below I discuss toe lever (TL) that in my opinion gives a more accurate understanding of the lever arm involved. 
                Toe Lever (TL) can be expressed as static toe lever or shod toe lever.  Shod TL is  measured from center of rotation of the coffin joint to where the hoof/shoe would leave the ground and static TL is measured from the center of rotation to the tip of the coffin bone.  Shod TL we can effect and static we cannot.    Lower BA coffin bones typically  have a longer TL than higher degree.  In my practice I see static TL as short as 45mm to as long as 75mm in adult horses.  Monitoring this at a young age may allow us to apply orthotics that will decrease the effective lever arm that antagonizes the lower limb.  Therapeutic shoe packages can be evaluated with regard to amount of lever arm relief.  Simply setting the shoe back only effects this measurement a few millimeters and sometimes many lameness issues respond to a TL that is 3-4 times less than what is measured on their bare foot. 
            Bone Angle (BA)  is the angle of the coffin bone when viewed in a lateral radiograph.  Average BA will be 50 degrees.  In my practice I have measured BA's as low as 36 degrees in very low heeled and long toed horses to 70 degrees in club feet.  The shape of the coffin bone determines the shape of the hoof.  Most of the time the horses that have low heel long toe conformation will have a less than 50 degree bone angle with a long measurable toe lever (see below) and the opposite is true for upright club feet. Granted, horses that have overgrown unkempt feet may have crushed heels and a long toe but may have a good BA.  I feel that monitoring this parameter early in life could potentially identify feet that may have a common sequelae with regards to lameness later in life.  For example, a horse with a 42 degree BA and a 70mm Toe lever may be at higher risk of hyperextension injuries of the pastern, coffin and fetlock joint and increased tension strain on deep digital flexor tendon, and navicular apparatus when compared to a coffin bone with a lower bone angle and shorter toe lever. If we could identify this early in a horse's career and change the shoeing protocol to better manage this handicap maybe we could reduce the  amount of wear and tear to some degree.  

                Palmar angle (PA) also known as solar angle of the distal phalanx or ventral angle is measured from the wings of the coffin bone in comparison to a level ground surface or embedded wire in block.  It can be tricky to measure in some feet with considerable bone remodeling.  Using the wings will offer the  most consistent measurement. This gives us a manner in which to evaluate flexor tendon engagement. In general lowering the PA increases tendon tension and raising should decrease the tension. This angle will average 3-5 degrees in the horse that maintains adequate sole depth and is free of lameness but can vary greatly.  PA should be evaluated in this manner:  Is this PA healthy for this foot?  The answer comes from evaluation of sole depth, clinical exam and digital alignment.  For example, PA measures 8 degrees and maintains a SD of 15/3 and good digital alignment.  This case is higher than what is ideal but currently considered healthy for this case.  On the other hand PA measures 3 degrees and sole depth is 7mm.  This is not likely a healthy PA as a higher PA with less deep digital flexor tendon tension will unload the solar corium and vital growth center of the sole.  This angle is also of great value to monitor in a preventive podiatry program.
Tendon Surface Angle (TSA) is measured on this distal part of the navicular bone compared to a level ground marker. This is relative to the course of the deep digital flexor tendon takes at turns to attach to the coffin bone.  Monitoring the change of TSA with your applied orthotic is of value especially cases that show navicular bone lesions in this region.   Simply changing DB  may be beneficial in many cases however raising PA and TSA is often required to be therapeutic.


Figure 4 Pre and post shoeing measurements


Figure 4 illustrates the measurements that changed in a pre and post shoeing lameness case. Note the shortened shod toe lever, increase in tendon surface angle and palmar angle.  Digital alignment has improved greatly.  By raising the palmar angle and reducing the lever arm we have reduced tension in the deep flexor tendon.  Subsequently reducing load in the solar corium under tip of the coffin bone, navicular apparatus and extraction forces at the dorsal wall to sole interface.  Horse was sound and off bute the next day.


Figure 5 low versus high on a 6 mo old foal


Figure 5 is  a 6 month old fold that was being evaluated for management of a club foot.  Note the significant differences in coffin bone angle, palmar angle, and toe lever.   The main difference is the deep flexor suspension.   Each have very different mechanical properties and require different trimming and shoeing approaches.  Trying to match feet with a perfect toe angle doesn't make since when the internal structures are ghastly different.


Figure 6 long toe low heel/neg pa hoof versus a grade 3 club


Figure 6 is comparing measurements in two different adult horses.  One with severe negative palmar angle and the other a grade 3 club.  Note the difference in bone angle, palmar angle, tendon surface angle and the static toe lever.  These differences must be considered and exemplifies the reason that all hooves can't be shod the exact same way and expect it to fit all the different foot types.  It is similar to asking us all to wear the same size pants even though we all have our unique characteristics.
            Clinical evaluation is directed at evaluating growth rings, hoof quality and length from the widest part of the foot forward.  Clubby feet with higher deep flexor tension will have growth rings that are narrow at the toe and get wider towards the heel.  Again this is secondary to the loads creating a vascular compression and decreased nutrient flow to these areas.  This widest part of the foot which correlates very close to the center of rotation will typically be in the middle of or just in front of the middle of the hoof.  The low heel type foot with lower suspension properties within the deep flexor tendon will have more load in the heels.  This results in growth rings that are wider at the toe and narrower at the heel.  The widest part of the hoof is typically in the palmar third creating a long lever arm. 


Figure 7 Grade 2.5 club with heel outgrowing toe versus a crushed heel with toe outgrowing heel


                Note in figure 7 the club foot on the  has growth rings that diverge from toe to heel and the crushed heel  diverges from the heel to the toe. 

Other aspects to consider from the solar view is frog characteristics.  Typically with upright clubby feet that present as adults will have recessed atrophied frogs compared to the crushed heel hoof that will have a robust strong frog.  Paying close attention to bulges will also further define regions of excessive load.  This will occur around the apex of the frog with higher grade clubs and laminitic feet and just under the wings in negative palmar angle or crushed heel feet.  Another good tool is watching your patients go in soft footing and watching what the coronary band, toe and heel does.  Watch the heel and toe for sinking into the forgiving footing.  Watch the coronary band.  Does is stay level, rotate forward and more positive or backwards and more negative.  This will also give you a good indication of the deep flexor system and what is will allow. 

            This mechanical scenario has implications that must be considered in every foot disease.  Using the podiatry style radiograph and venogram to determine compromised areas and design a therapeutic shoeing program is paramount to have repeatable success.  Simply altering the toe lever length by setting a shoe back, rolling or rockering the toe and use of natural balance shoes has proven to offer mechanical advantage but has its limitations.  Greater success is obtained by altering and monitoring sole depth, palmar angle, tendon surface angle and digital alignment.  Difficult cases in my practice have pre and post shoeing radiographs at every visit.  The pre-shoe gives you information regarding how the horse responded to your mechanical therapy with regards to palmar angle, sole depth and digital alignment. The post shoeing radiographs sets a new baseline and confirms you have accomplished your therapeutic goal with your trim and shoe application.  

Monday, December 22, 2014

How to Take Farrier Friendly Radiographs. Presented at OSU CVM fall conference 2014

How to Take Farrier Friendly Radiographs
Sammy L. Pittman, DVM
Innovative Equine Podiatry and Veterinary Services, Pllc

            Gaining relative information within the hoof capsule, that helps the vet/farrier team make decisions, requires a consistent and detailed approach.  Most of us learn radiographic technique that concentrates a study on bony structures.  The same radiographic views that detail the coffin joint or navicular bone are essentially useless to designing a therapeutic shoeing program.  It gives us no reliable information with regards to the mechanical properties that are in play. 
            Informative radiographs are relative to the answers we seek.  Being attentive to the many details will allow consistent repeatable and comparative images.  Following the guidelines below will give you the ability to produce consistent and reliable radiographic exams helpful in evaluating the mechanical properties affected by trimming and shoeing. 
1)  Place both hooves on blocks that are designed to allow the primary beam to penetrate the hoof between the palmar rim of the coffin bone and ground surface.  Wire embedded into the surface of the blocks is helpful when measuring relevant angles.  To determine height of blocks set your xray generator on the ground and measure to the center of the crosshairs on the collimator then subtract 1/2 to 3/4 of an inch.  This will consistently place your beam just below the coffin bone in most barefoot and shod horses with the exception of large padded packages.  If the horse toes out then the blocks toe out as well and the same for  a toed in conformation.  Blocks should be about the same width apart as the gap in between the upper forearm at the level of the sternum.  This will be about one hands width in most light breed horses.  The hoof should be set to the medial and palmar/plantar edge of the block to allow the radiograph cassette/plate to be touching the hoaof in the lateral view and as close as possible in the dorsopalmar views.  Aligning the frog stay or central sulcus with the sagittal wire marker embedded into the block will aid in appropriate beam alignment for the Dp and lateral view. 

2)   Beam orientation must be centered on the area of interest.  Trying to identify important measurements relative to therapeutic shoeing and trimming requires a low beam orientation.  This is consistently obtained by setting up your blocks as previously described.  A perpendicular beam to cassette/plate orientation should always be obtained to prevent distortion of your image. 

High beam


High Beam


Low beam


Low Beam


3)  The cassette/plate should be touching the hoof on the medial side in the lateral view to prevent as much magnification as possible. 
4) Use radiographic paste to mark the dorsal hoof wall in the sagital plane in all lateral views.  The paste should start where the last hair exits and extend to entire length of the hoof capsule.  This allows accurate measurement of coronary band to extensor process distance, horn-lamellar zones, and allows definition of every ripple, defect or growth ring. 
5)  Focal film distance should be always consistent and can range from 24" to 28".  Typically with today's smaller units closer to 28" allows visualization of just below fetlock.  Just keep it consistent. 
6)  A calibration instrument should be placed in the sagittal plane for the lateral and the transverse plane for the dorsopalmar view.  Most digital radiographic software allows for calibration based on a known measurement in the radiograph.  Metron software has a built in calibration component and a specific calibration instrument embedded into their blocks or an autoscaler.  However, simply placing a known length of wire or metal bar stock in the plane of interest will allow you to calibrate your radiograph regardless of software.  Calibration is important to correct for magnification that occurs. This magnification will be consistent if you your radiographic technique is consistent but it is important to document this detail.  Typical magnification is around 10 percent.  This factor is important if you are taking measurements on the radiograph and transferring them to the hoof.   Correction of magnification without software can be accomplished by a simple math equation. Where (actual foot measurement)={ (Length of Calibration tool) x (radiographic measurement of concern)} / ( radiographic measurement of the calibration tool).


Good Bone Detail but not good for soft tissue
7)  Radiograph technique can vary widely but typically  low Kvp  and higher Ma produces better soft tissue detail.  Today's digital units often give us a good representation of bone and soft tissue detail but it is still worth playing with your settings to find greater grey scale within the hoof capsule.  Seeing the dermo-epidermal junction is a good guideline to know if you are seeing enough soft tissue detail.  I also like to see the deep flexor tendon in my foot films.       
            Currently I measure and monitor several distances and angles to follow the health of the foot, design therapeutic shoeing plans and monitor disease processes.  Below is a description and diagram of each measurement, how to measure and a short discussion about each measurement.


            Coronary band to extensor process (CE) is measured from top of paste which is applied at most proximal aspect hoof wall at the point of the last hair follicle down to the extensor process of the coffin bone.  This will range from 8 to 30 mm in most healthy hooves.  This number does not give you much information as a single measured parameter.  However, when monitored and compared in serial radiographs, especially when monitoring an acute laminitis case, it is extremely valuable. For example, an acutely laminitic patient that measures 8mm on day 1 of clinical signs and then measures 18mm on day 4.  This is a 10mm  distal displacement which is usually accompanied by a 10mm decrease in sole depth as well and varying degrees of rotational displacement.  

            Horn-Lamellar zone (HL) is measured in two areas, one proximal just below extensor process and one distal just above apex of coffin bone.  This will most commonly measure 15 mm in most light breed horses but can be as high as 20mm in larger breeds, mules and donkeys.  This measure is expressed as proximal HL/Distal HL (15/15).  Instead of measuring only rotation this will give you a measurable displacement that is more definitive than a generic rotation.  Evaluating the dermal-epidermal junction is also of great importance as it should split the horn lamellar zone further defining each.  This allows more specific interpretation of changes in the HL zone.  For example with laminitis the L component of the HL zone will change not the H component.  Early in laminitis this may be the only notable change and an increase of 3-4 mm is a significant finding and may have no measurable rotation.  Several important disease processes can be discovered in this zone and many foot diseases such as clubs, chronic/acute laminitis, white line disease, keratomas and abscesses have very unique qualities that can be shown here.

            Sole Depth (SD) is measured from the tip of the coffin bone down to most distal aspect of the sole.  The cup is also of importance as it is present to different degrees depending on health or pathology and can also be falsely created.  This measurement is expressed as SD/Cup.  Healthy feet with no pathology will most commonly carry 12-15mm of sole and a 2-3mm cup (15/3). This should be of upmost concern of the vet/farrier team when striving to obtain soundness and health of the foot.  This should be the measurement at the day of the farrier visit.  Often thin soled horses are at 6-7mm of sole 8 weeks into the cycle and this is a sign of a compromised foot that requires a different approach to increase foot mass and health. Two measurements can be made to give you more information, one at tip of coffin bone and one under wing of coffin bone.  Venogram findings suggest that a depth of 15mm is required to maintain a healthy appearance to the solar vascular bed with robust and correctly aligned terminal papillae

            Digital Breakover (DB) is measured from the tip of the coffin bone to where the foot or shoe if shod would leave the ground.  Healthy hooves that maintain adequate SD and good digital alignment will commonly maintain a DB of 20-25mm.  Many times in perimeter fit shoes, depending on type of foot, bone angle, and toe lever this number is considerably higher than ideal at the day of the farrier visit and continues to lengthen throughout the cycle due to hoof growth. This gives us a measurable lever arm that applies its force to the deep digital flexor tendon and its subsequent force impacts on apex of the coffin bone, dorsal hoof wall and navicular apparatus.  Below I discuss toe lever (TL) that in my opinion gives a more accurate understanding of the lever arm involved. 

            Bone Angle (BA)  is the angle of the coffin bone when viewed in a lateral radiograph.  Average BA will be 50 degrees.  In my practice I have measured BA's as low as 36 degrees in very low heeled and long toed horses to 70 degrees in club feet.  The shape of the coffin bone determines the shape of the hoof.  Most of the time the horses that have low heel long toe conformation will have a less than 50 degree bone angle with a long measurable toe lever (see below) and the opposite is true for upright club feet. Granted, horses that have overgrown unkempt feet may have crushed heels and a long toe but may have a good BA.  I feel that monitoring this parameter early in life could potentially identify feet that may have a common sequalae with regards to lameness later in life.  For example, a horse with a 42 degree BA and a 70mm Toe lever may be at higher risk of hyperextension injuries of the pastern, coffin and fetlock joint and increased tension strain on deep digital flexor tendon, and navicular apparatus when compared to a coffin bone with a lower bone angle and shorter toe lever. If we could identify this early in a horse's career and change the shoeing protocol to better manage this handicap maybe we could reduce the  amount of wear and tear to some degree.  

            Palmar angle (PA) also known as solar angle of the distal phalanx or ventral angle is measured from the wings of the coffin bone in comparison to a level ground surface or embedded wire in block.  It can be tricky to measure in some feet with considerable bone remodeling.  Using the wings will offer the  most consistent measurement. This gives us a manner in which to evaluate flexor tendon engagement. In general lowering the PA increases tendon tension and raising should decrease the tension. This angle will average 3-5 degrees in the horse that maintains adequate sole depth and is free of lameness but can vary greatly.  PA should be evaluated in this manner:  Is this PA healthy for this foot?  The answer comes from evaluation of sole depth, clinical exam and digital alignment.  For example, PA measures 8 degrees and maintains a SD of 15/3 and good digital alignment.  This case is higher than what is ideal but currently considered healthy for this case.  On the other hand PA measures 3 degrees and sole depth is 7mm.  This is not likely a healthy PA as a higher PA with less deep digital flexor tendon tension will unload the solar corium and vital growth center of the sole.  This angle is also of great value to monitor in a preventive podiatry program.
Toe Lever (TL) can be expressed as static toe lever or shod toe lever.  Shod TL is  measured from center of center of rotation of the coffin joint to where the hoof/shoe would leave the ground and static TL is measured from the center of rotation to the tip of the coffin bone.  Shod TL we can effect and static we cannot.    Lower BA coffin bones typically  have a longer TL than higher degree.  In my practice I see static TL as short as 45mm to as long as 75mm in adult horses.  Monitoring this at a young age may allow us to apply orthotics that will decrease the effective lever arm that antagonizes the lower limb.  Therapeutic shoe packages can be evaluated with regard to amount of lever arm relief.  Simply setting the shoe back only effects this measurement a few millimeters and sometimes many lameness issues respond to a TL that is 3-4 times less than what is measured on their bare foot. 

Tendon Surface Angle (TSA) is measured on this distal part of the navicular bone compared to a level ground marker. This is relative to the course of the deep digital flexor tendon takes at turns to attach to the coffin bone.  Monitoring the change of TSA with your applied orthotic is of value especially cases that show navicular bone lesions in this region.   Simply changing DB  may be beneficial in many cases however raising PA and TSA is often required to be therapeutic.

References:
            1.  Redden, R.F. Clinical and Radiographic Examination of the Equine Foot. In Proceedings  Am. Assoc. Equine Pract. 2003;49:174.
            2.  Merit, K.  How to take foot radiographs. In proceedings Am. Assoc. Equine Pract. 2008.

            3.  Floyd, A. Mansman, R.  2007  Equine podiatry, Radiology and Radiography of the Foot.  pg 141

Monday, October 27, 2014

Whats in a toe angle

Whats in a toe angle?  Here are two foals that would be considered to have a club foot with a toe angle of close to 64 degrees.  However what makes up the angle on the inside dictates what the foot will do and what it takes to manage it.   The foot on the left has a lower bone angle and a  higher Palmar angle.  This is a system that is under higher deep flexor tension rasingbthe heel and palmar angle.  Notice there is more dishing of the toe on the left  radiograph as well.   All indications that the deep flexor acting very heavy on the coffin bone. 

The radiograph on the right has a very large bone angle and lower Palmar angle, and no dishing. 

Palmar angle plus the bone angle will equal the toe angle. 

The hoof on the left will require more attention directed at relieving deep flexor tension via shoeing mechanics (rocker shoe) or surgery (check ligament desmotomy). The hoof on the right will be easier to manage with trimming alone and or low scale rocker shoe to add some foot mass to further protect the fragile coffin bone during development.  

This is why radiographs are so very helpful in managing foot problems.  You will never go wrong gaining specific information about your problem.

Sunday, January 5, 2014

Setting the bar for success in my laminitis cases

Welcome to 2014!  I wanted to review some of my laminitis cases that have proven very successful with regards to quickly adding sole mass and demonstrating an even hoof wall growth from toe to heel.  A couple of cases will also demonstrate how quickly the venogram can change.  Improvement in the blood supply is what we are all after.When you can demonstrate a quickly improving venogram study plus the quick addition of sole depth you can be a more positive about the overall situation.  Success to me is rapid foot recovery and ideally reversing the damaging effects of vascular compression before it creates irreversible bone and soft tissue damage.  Monitoring with venograms will show the level of vascular damage present  and allows a quicker more accurate mechanical therapy.  

For a review on soft tissue parameters measured on a podiatry style radiograph click here.

For a reference on a healthy venogram click here.


The first case is Rocky.  Rocky was first examined about 3 months after the initial insult and was well past the ideal time to completely avert any bone change.  Note the big divot out of the tip of the coffin bone caused by a severely displaced circumflex artery and terminal papillae is supplies. This chronic history, severe coffin bone displacement and venogram indicated the need for a deep flexor tenotomy (cutting of the tendon) after derotational shoeing.  


Note the quick addition of sole mass and a decrease in the amount of rotation within the hoof capsule.  Loss of rotation is not the goal but a common finding after changing the load dynamics by cutting the tendon.  This places a majority of the load towards the back of the coffin bone and can push the tip up in many cases to reduce the amount of rotational displacement and unload the circumflex under the rotated tip of the coffin bone.  Left column is the day of surgery and the right column is 30 days later.  Note the rapid addition of sole under the tip of the coffin bone.  The 3 months prior the hoof wall growth was greater in the heel than in the toe area which is very common with laminitis.  This is secondary to the vascular compression in the front half of the foot.  This is confirmed in the above venogram. The blood supply to the coronary band should be much fuller than demonstrated here.  After the tenotomy the hoof wall began to grow more even as we have unloaded the forces applied by the tendon and allowing a reperfusion of blood to these vital areas.  


 The images in the left are post shoeing radiograph from the 30 day post tenotomy visit and the images on the right are 30 days after that or 60 days post tenotomy.  The inital shoes are glued on and are usually left on for the first 10-12 weeks and many cases are barefoot at that time.  This case was growing so rapidly and to properly manage the palmar angle (prevent from getting into the negative zone) the shoe was removed, the foot trimmed and very lightly nailed back on parallel the the wings of the coffin bone.  Again note the amount of sole depth recovery within this 30 day period.  

The bottom two images are 90 days post tentomy.  This horse is comfortable barefoot and can maintain a zero to slightly positive palmar angle.  

Plan is for this horse to start hand walking daily for 5-10 minutes just to get him out of the stall. Recheck at 4-6 week intervals with radiographs to insure continued foot mass recovery and maintenance of the palmar angle.  This horse may very well be able to do some light riding in another 6-8 months with some turnout.  Because of the severe bone remodeling that had already occurred I am hesitant to say he will return to 100 percent of what he was prior lamintis but can have a good quality of life.  


Case #2  Gracie
Gracie had been guilty of getting into the owners bird seed and dog food and was a touch overweight.  Surprisingly fairly sound and would only rock back on hind quarters in turn.  A considerable amount of coffin bone displacement had already occurred which indicates the syndrome has been rolling for some time.  Owners reported some pain over the last 4 weeks only.  Note the distal divergent horn lamellar zones and loss of sole depth.  


Placed in Nanric modified ultimates the performed a venogram.   Venograms in the left column are the first exams and the right column are venograms performed 9 days later.  Note the improvement in the vascular structure around the tip of the coffin bone.  This is secondary to the wedges unloading the tendon tension by decreasing the distance from its origin to insertion with the coffin bone.  This allows the load to be transferred to the heels an back of coffin bone.  I also measured a 3mm increase in sole depth in this short period.  This is likely due to the unloading of the solar corium directly under the tip of the coffin bone.  Think of placing a clothes pin on your finger smashing is flatter.  It will measure a greater thickness once the clothes pin compression is removed and the tissue is once again filled with blood.  


Below are images that are taken 30 days after placement in the nanric modified ultimates placing the palmar angle at approximately 20 degrees

Below are images that  are  90 days in the ultimates wedges

This demonstrated a rapid change in the vascular pattern with the addition of the wedging and did not require a higher level of deep flexor tendon relief as the previous case in which the tendon was cut.  Just placing a little slack in the tendon system is often all that is required to unload the vascular supply in important compromised areas in the front of the foot and directly under the tip of the coffin bone.  This horse will then be transitioned to a rockered 4pt rail shoe that will continue to offer a greatly reduced load on the flexor tendon, solar corium and the lamellar attachments.  The level of rocker/mechanics will be slowly lowered as long as continued soft tissue response is noted.  


Case #3 is a  mustang that suffered lamintis in all four feet.  The fronts required a deep flexor tenotomy as the circumflex artery was displaced above the tip of the coffin bone and no contrast is noted below the tip of the coffin bone.  The hind venogram was also compromised but to a lesser degree.  The fronts where shod with a derotational tenotomy shoe followed by a deep flexor tenotomy and the hinds were placed in the ultimate wedges.  A follow up venogram performed on a hind foot demonstrated a positive improvement and suggest that a tenotomy is not needed at this time and supports continued use of the wedges.  One can already see the addition of sole depth in this short 10 day period in the fronts and hinds.


On the left below is a venogram of the left hind on initial exam and a follow up venogram 10 days later while wearing the modified ultimates placing the palmar angle at 20 degrees.  Note the significant improvement in vessel filling over the coronary band, the more normal appearance in the circumflex junction and return of solar and terminal papillae.


 Below are radiographs of the fronts.  The images on the left are taken on the day of surgery and radiographs on the right are 30 days post surgery.  Sole depth has easily more than doubled.  This is the rapid response required to quickly unload the vascular structures and aid in prevention of irreversible bone disease and chronic pain.


Below in the left column is 10 days post wedging and 30 days post in the right column.  


Below are the hinds 60 days post placement into the modified ultimates.  


 Below are the fronts 60 days post tenotomy.  Horse is barefoot with greater than 20 mm of sole.  You can see the new growth coming in at the upper hoof wall.  Note this case has very little if any boney changes or remodelling at this tip of coffin bone.  This is what I am shooting for in my laminitis therapy.  Prevent continued vascular compromise as quickly as possible to prevent irreversible bone disease.  This horse will likely go back to doing whatever he wants in two years with some light riding at one post tenotomy.  


These are just three cases from this summer and fall that demonstrated the quick response I am looking for.  Understanding the mechanics relative to the deep flexor and its role in a failing lamellar bond has proven very beneficial in my practice.  Monitoring the failing system with serial venograms will inform you quicker than plain radiographs.  Instead of waiting around for 4-6 weeks to evaluate the response in sole depth and hoof wall growth the venogram will demonstrate the level of compromise days to weeks before any changes can be noted otherwise.  This allows quicker changes in mechanical therapy and less irreversible damage.  This prevents chronic pain and abscesses.  

What do you consider a success?  Patient comfort? What level of sole depth recovery in a period of time do you expect with your laminitis therapy?

Wishing you happy and prosperous new year.

All the best

Sammy L. Pittman, DVM